

There are a lot of alternatives, but I like imageshack.us the most, so I am going to explain uploading images to this free host. You can click on the thumbnails below to see larger versions of screen shots. There are a lot of alternatives, but I like imageshack.us the most, so I am going to explain uploading images to this free host. You can click on the thumbnails below to see larger versions of screen shots.


How to upload template images to a free image host

How to upload template images to a free image host
Tutorial to Create Blogger Template
This tutorial is to create simple blogger template, with simple methods. The easiest way to create blogger template is by edit a template. But don't worry, althought this is a simple methods but it can produce a beautifull template, it depend on how you design it. This tutorial is not to create blogger template from beginning but this is to create template by editing a template. Ok lets begin.
Before we begin I suggest you to create a new blog,weI don't wont to destroy your blog.
To follow this tutorial you have to download this template first. downlad template.
We will create a template that contain four main elements, (Bakground, Header, Main and Footer) Like the image :
So you have to create the four elements, You can use Image editor software like Adobe Photoshop, Corel Draw, Paint, etc.
Here's the detail to design it:
1. Create a design like above image.
2. On the backgroun part it should be a Pattern/Tile.
3. Cut for every part (Background, Header, Main and Footer)
it should be like this :![]() background
background header
![]() main
main![]() footer
footer
4. Upload your part image on the webhosting like geocities or on the image hosting like photobucket.
Alll right, now we will arrange these part to the HTML.
1. Go to blogger then go to "EDIT HTML" menu.
2. Click on the "Brows" button to upload above template or this template
3. Find this code
body { margin: 0px; padding: 0px; text-align: left; font:$bodyfont; color:$textcolor; background: #323232 url('http://blogoholic.info/files/bg.jpg') repeat-x top left; }
4. Change the bold text with your image location
5. Then find this code, and change the blod text with your image location :
#center {background: #ffffff url('http://blogoholic.info/files/body.jpg') repeat-y top center;}
6. Find the code below and change the bold text with your image location:
#header { margin: 0; height:196px; width:898; color: $pagetitlecolor; background: url('http://blogoholic.info/files/head.jpg') no-repeat top center; }
7. Find the code below and change the bold text with your image location:
#footer { margin: 0; width: 898px; height:80px; padding: 0px; background: url('http://blogoholic.info/files/foot.jpg') repeat-y top center; }
8. Now find the code below
#outer-wrapper { width: 898px; margin: 0px auto 0; text-align: justify; }
this code width: 898px it's the widht of your blog, change it according to your image.
#main { float: left; width: 445px; margin: 5px; padding: 0px 0px 0px 10px; line-height: 1.5em; word-wrap: break-word; /* fix for long text breaking sidebar float in IE */ overflow: hidden; }
This code width: 445px; is size/widht of main, you can change it.
#sidebar { float: right; width: 153px; padding-right: 50px; font-size: 83%; color: $sidebartextcolor; line-height: 1.4em; word-wrap: break-word; overflow: hidden; }
#ads-wrapper {float: left; width: 195px; padding-left: 10px; word-wrap: break-word; overflow: hidden; }
This code width: 153px; is widht of your right sidebar. and this code width: 195px; is widht your left sidebar. And this code padding-right: 50px; is gap of text on the right sidebar with right line. And this code padding-left: 10px; is gap of text on the left sidebar with left line.
#header { margin: 0; height:196px; width:898; color: $pagetitlecolor; background: url('http://blogoholic.info/files/head.jpg') no-repeat top center; }
This code height:196px; width:898; is height and widht of your header, Change it according to your Header Image.
#footer { margin: 0; width: 898px; height:80px; padding: 0px; background: url('http://blogoholic.info/files/foot.jpg') no-repeat top center; }
This code width: 898px; height:80px; is widht and height of your footer.
9. Try to modify and preview it until looks good.
10. If it looks good you can save it.
GOOOD LUCK!!!!!!
How to Access Free Yahoo! Mail with Windows Live Mail
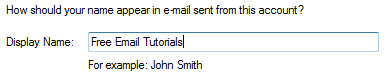
Setting up your Yahoo! Mail account in Windows Live Mail is a very straightforward process. In the first field ("E-mail address"), type your full Yahoo! Mail email address in the following format yourUserName@yahoo.com: The second field ("Password") is requesting your Yahoo! Mail password; it is safe to give it to Windows Live Mail. Windows Live Mail will automatically choose to remember your Yahoo! Mail password, but you can uncheck the "Remember password" checkbox if you want. The last field ("Display Name") determines how emails you send from Yahoo! will appear to recipients. The display name can be anything, and doesn't have to match your Yahoo! Mail user name (the portion of your email address which comes before "@yahoo.com"). Before clicking the Next button, make sure to check the "Manually configure server settings for e-mail account" checkbox for Yahoo! Mail: Clicking Next will bring Windows Live Mail's connection settings screen. It includes all the login/authentication data you need to enable a connection to your Yahoo! Mail account: The top section of this screen deals with Incoming Server Information: in other words, how Windows Live Mail will retrieve your emails from Yahoo!'s servers. Choose "POP3" as server type. The incoming mail server value is The bottom section of Windows Live Mail's email account setup screen contains the Outgoing Server Information, or the connection settings used by Windows Live Mail to send emails through the Yahoo! Mail Plus service: The outgoing server address is Click Windows Live Mail's Next button; you finished setting up your Yahoo! Mail account. If Windows Live Mail could successfully connect to Yahoo! Mail's servers, it will give you the following confirmation: ============================================================================================ OR YOU CAN USE THIS WAY:: To set up a free Yahoo! Mail account in Windows Live Mail using YPOPs!: To add Yahoo! Mail to your Windows Live Mail as an IMAP account using IzyMail: The first time you open Windows Live Mail, the "Add an E-mail Account" dialog automatically opens. If it doesn't appear, locate the "Add an e-mail account" button in Windows Live Mail's left pane; click this button to open the email account wizard:
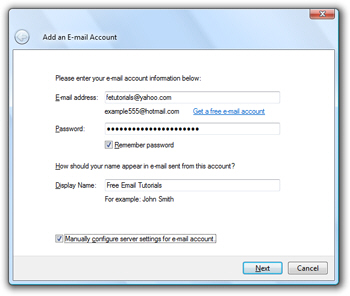
ENTER YOUR YAHOO! MAIL ACCOUNT INFORMATION


ENTER YOUR YAHOO! MAIL CONNECTION SETTINGS
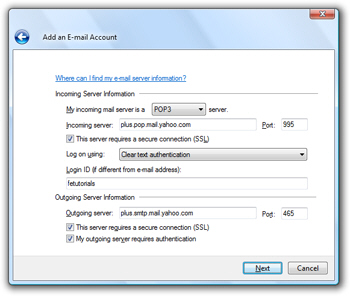
YAHOO! MAIL INCOMING SERVER SETTINGS
plus.pop.mail.yahoo.com, using port 995.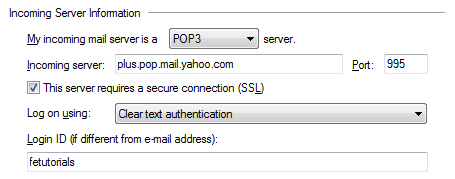
Check the "This server requires a secure connection (SSL)" checkbox. You can leave the default setting for logging on, which is "Clear text authentication". Under Login ID, enter your Yahoo! Mail user name (the part of your email address that comes before "@yahoo.com").YAHOO! MAIL OUTGOING SERVER SETTINGS
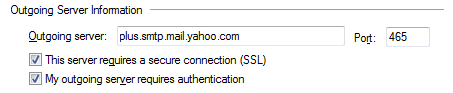
plus.smtp.mail.yahoo.com, using port 465. Make sure to check both checkboxes: "This server requires a secure connection (SSL)", and "My outgoing server requires authentication".FINALIZING YOUR YAHOO! MAIL ACCOUNT SETUP
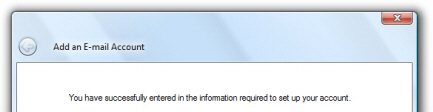
 If Windows Live Mail does not give you this confirmation, it either means that your Yahoo! Mail password was incorrect, that your Yahoo! Mail email address has a typo, or that your Internet connection was faulty. Otherwise, your are ready to use your Yahoo! Mail account.
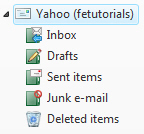
As soon as your Yahoo! Mail account information is downloaded in Windows Live Mail, you will see the standard folders displayed in the left pane, as well as any custom email folders you may have created.Access Free Yahoo! Mail with Windows Live Mail Using YPOPs! (Simple and Free)
Access Free Yahoo! Mail with Windows Live Mail Using IzyMail (IMAP Access to Folders)
